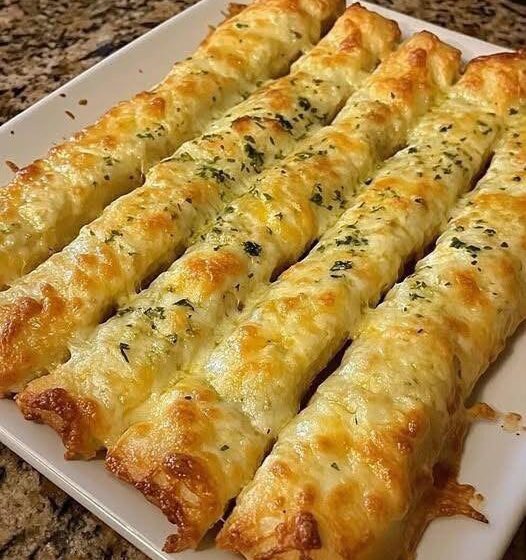
Cheesy Garlic Breadsticks
Few things are as irresistible as warm, freshly baked Cheesy Garlic Breadsticks straight from the oven. With a soft and fluffy interior, a golden crust, rich garlic butter, and layers of melted cheese, these breadsticks are the ultimate comfort food. Whether you’re serving them alongside pasta, soup, salad, or enjoying them as a snack on their own, cheesy garlic breadsticks are always a crowd-pleaser.
The combination of buttery garlic flavor and gooey melted cheese creates a side dish that often steals the spotlight from the main course. Inspired by restaurant-style breadsticks but made entirely from scratch, this homemade version offers superior flavor, texture, and freshness. Best of all, the recipe is surprisingly simple and requires only a handful of basic ingredients.
Perfect for family dinners, game-day gatherings, parties, or casual weeknight meals, these breadsticks are guaranteed to disappear quickly. Once you experience the aroma of garlic butter and bubbling cheese filling your kitchen, you’ll understand why this recipe becomes an instant favorite in so many households.
Why You’ll Love This Recipe
- Soft, fluffy, and perfectly chewy texture.
- Loaded with garlic butter flavor.
- Covered in melted, golden cheese.
- Easy to make with simple ingredients.
- Perfect as a side dish, appetizer, or snack.
- Better than restaurant breadsticks.
Ingredients
For the Dough
- 3 cups all-purpose flour
- 2 ¼ teaspoons instant yeast (1 packet)
- 1 tablespoon sugar
- 1 teaspoon salt
- 1 cup warm water
- 2 tablespoons olive oil
For the Garlic Butter Topping
- 4 tablespoons unsalted butter, melted
- 4 cloves garlic, minced
- 1 teaspoon dried parsley
- ½ teaspoon garlic powder
For the Cheese Topping
- 1 ½ cups shredded mozzarella cheese
- ½ cup shredded Parmesan cheese
- ½ teaspoon Italian seasoning
Optional Garnishes
- Fresh parsley, chopped
- Crushed red pepper flakes
- Extra grated Parmesan cheese
Equipment Needed
- Large mixing bowl
- Measuring cups and spoons
- Baking sheet or pizza pan
- Rolling pin
- Pastry brush
- Parchment paper
Step-by-Step Instructions
Step 1: Prepare the Dough
In a large mixing bowl, combine the warm water, sugar, and yeast.
Allow the mixture to sit for about 5 minutes until the yeast becomes foamy.
Add the olive oil and salt.
Gradually mix in the flour until a soft dough forms.
Step 2: Knead the Dough
Transfer the dough to a lightly floured surface.
Knead for approximately 8 to 10 minutes until smooth and elastic.
The dough should feel soft but not sticky.
If necessary, add small amounts of flour while kneading.
Step 3: First Rise
Place the dough in a lightly oiled bowl.
Cover with a clean kitchen towel.
Allow it to rise in a warm place for about 1 hour, or until doubled in size.
This step helps develop the light, fluffy texture that makes homemade breadsticks so delicious.
Step 4: Prepare the Garlic Butter
While the dough is rising, combine the melted butter, minced garlic, parsley, and garlic powder in a small bowl.
Stir well and set aside.
This flavorful mixture will infuse every bite with rich garlic flavor.
Step 5: Shape the Breadsticks
Preheat your oven to 425°F (220°C).
Line a baking sheet or pizza pan with parchment paper.
Punch down the risen dough and transfer it to the prepared baking surface.
Using your hands or a rolling pin, shape the dough into a rectangle approximately 10 x 14 inches.
Step 6: Add the Garlic Butter
Brush most of the garlic butter mixture evenly across the surface of the dough.
Reserve a small amount for after baking.
Spread the butter all the way to the edges for maximum flavor.
Step 7: Add the Cheese
Sprinkle the mozzarella cheese evenly over the dough.
Follow with the Parmesan cheese and Italian seasoning.
The generous cheese layer creates the signature gooey topping everyone loves.
Step 8: Bake
Bake for 12 to 15 minutes, or until the cheese is melted and bubbly and the edges are lightly golden brown.
For extra browning, switch the oven to broil for the final 1 to 2 minutes while watching carefully.
Step 9: Slice Into Breadsticks
Remove from the oven and immediately brush with the remaining garlic butter.
Allow the breadsticks to cool for a few minutes.
Using a pizza cutter or sharp knife, cut into strips.
Step 10: Garnish and Serve
Sprinkle with fresh parsley, extra Parmesan cheese, or crushed red pepper flakes if desired.
Serve warm while the cheese is still perfectly melted.
Tips for Perfect Cheesy Garlic Breadsticks
Use Fresh Garlic
Freshly minced garlic provides the most vibrant flavor and aroma.
Don’t Overload the Dough
While cheese is delicious, adding too much can make the breadsticks heavy and difficult to bake evenly.
Let the Dough Rise Fully
Proper proofing ensures a light and fluffy texture.
Bake on a Hot Surface
A fully preheated oven helps create a golden crust while keeping the inside soft.
Variations and Customizations
Three-Cheese Breadsticks
Add provolone, Monterey Jack, or cheddar cheese for an even richer flavor profile.
Herb Breadsticks
Mix dried oregano, basil, rosemary, or thyme into the garlic butter.
Spicy Version
Add crushed red pepper flakes or sliced jalapeños before baking.
Stuffed Breadsticks
Fold mozzarella cheese into the dough before shaping for a cheesy surprise inside.
Whole Wheat Option
Replace up to half of the all-purpose flour with whole wheat flour for a heartier texture.
What to Serve with Cheesy Garlic Breadsticks
These breadsticks pair wonderfully with a variety of meals.
Pasta Dishes
Serve alongside:
- Spaghetti
- Fettuccine Alfredo
- Lasagna
- Baked ziti
Soups
Perfect companions include:
- Tomato soup
- Chicken noodle soup
- Creamy potato soup
- Minestrone
Salads
A crisp Caesar salad or garden salad balances the richness of the breadsticks beautifully.
Dipping Sauces
Try serving them with:
- Marinara sauce
- Ranch dressing
- Garlic butter
- Cheese sauce
Storage Instructions
Refrigerator
Store leftover breadsticks in an airtight container for up to 3 days.
Freezer
Freeze baked breadsticks for up to 2 months.
Wrap tightly in plastic wrap and place in a freezer-safe bag.
Reheating
Reheat in a 350°F (175°C) oven for 5 to 8 minutes until warmed through.
Avoid microwaving if possible, as it can make the breadsticks soft rather than crisp around the edges.
Why Homemade Breadsticks Are Better
Making breadsticks from scratch allows you to control every ingredient and customize the flavor to your liking. Homemade dough creates a fresher taste, softer texture, and more satisfying chew than most store-bought alternatives.
You can also adjust the amount of garlic, cheese, and herbs to create your perfect version. The aroma of freshly baked bread and melted cheese alone makes the effort worthwhile.
Final Thoughts
Cheesy Garlic Breadsticks are the ultimate side dish for anyone who loves warm bread, buttery garlic, and melted cheese. Their soft interior, golden crust, and irresistible flavor make them a favorite for family dinners, parties, and casual gatherings alike.
Simple ingredients come together to create a bakery-quality treat that pairs beautifully with countless meals. Whether served with pasta, soup, salad, or enjoyed on their own, these homemade breadsticks deliver comfort, flavor, and satisfaction in every bite. Once you make them from scratch, you’ll never want to settle for frozen or takeout breadsticks again. 🧄🧀🥖✨